If you are using LLMs/AI models with OpenWebUI that do not run locally, you always have the risk of exposing personal data by mistake. Or you host OpenWebUI in your company with multiple users, that are not aware of the risks of uploading personal data into it?
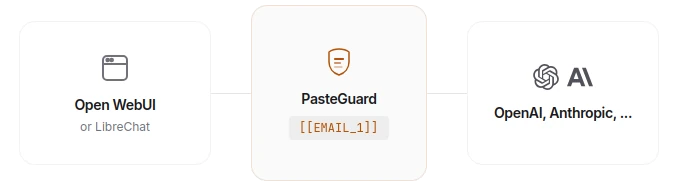
Pasteguard helps guarding this pasted data (formerly LLM Shield). It works as a proxy between you and the API endpoint of the LLM / AI provider (OpenAI/ChatGPT, Anthropic/Claude or OpenRouter).
Over 30 types of sensitive data across 24 languages get detected and protected by Pasteguard: Names, Emails, Phone numbers, Credit cards, IBANs, IP addresses, Locations, API keys, SSH keys, JWT tokens, Passwords, Connection strings, Private keys and Bearer tokens.
Disclaimer: Pasteguard is vibe-coded but architected and reviewed from the creator. Just wanted to mention this, because not everyone is fine with the term “Vibe-Coding”.
The code is available on Github - sgasser/pasteguard, feel free to look into it.
Source: Offical documentation
For a very quick setup with no further configuration and without persistent logs, run this command:
docker run --rm -p 3000:3000 ghcr.io/sgasser/pasteguard:en
Choose the tag :en at the end, if you only write in english with your AI. If you are from europe, you can choose :eu to get support for european languages.
If you want persistent logs about detected and protected prompts, you need the config.yaml (available from the official repository).
Copy that to your working directory (for example /opt/docker/pasteguard) and create a data directory.
# Download configcurl -O https://raw.githubusercontent.com/sgasser/pasteguard/main/config.example.yaml
mv config.example.yaml config.yaml
# Create data directorymkdir -p data
Now we can edit the config.yaml to our desires. Look into the downloaded example config and adjust it to your preferences. My adjusted config looks like this:
In my configuration I scan for all available types of personal data in the languages English and German (since I am from Germany). Also, I enable the dashboard.
With this config.yaml and the created data directory, we can start the Docker container with this command (run it in the directory, where your ./data and ./config.yaml is placed):
Start the container with docker compose up -d in your working directory (Hint: docker-compose with a dash instead of docker compose for old Docker versions).
After a couple of seconds we can visit the dashboard at http://localhost:3000/dashboard. If you are running it on a headless server, visit it at the IP of the server - for example 192.168.178.5: http://192.168.178.5:3000/dashboard.
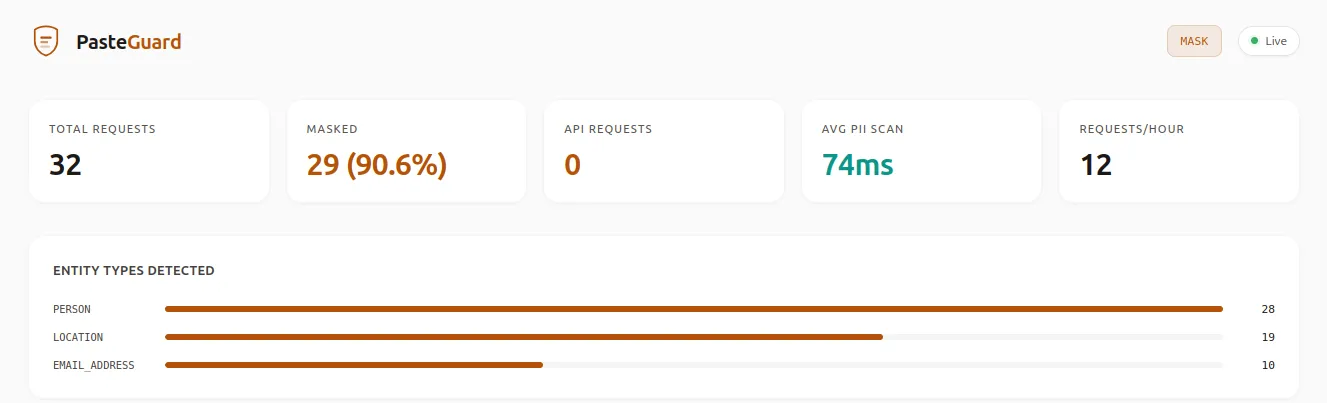
You should now see the dashboard:
Since I already tested it, I already got some masked requests. In your case, the dashboard will of course be empty.
If you are not getting the dashboard or run into error messages, look into the logs of your container with docker logs pasteguard.
I had problems using the data directory, which I could not fix (yet) - see this issue on Github.
Running in this problem too? Just delete the ./data:/pasteguard/data from your docker run command / your docker-compose.yml.
Pasteguard works without it, but your logs will not be persistent and lost after restarting the container, which is just a problem, if you need them for example for audits. In my case, they are interesting, but not important.
To use Pasteguard in OpenWebUI, we now have to edit our connection in OpenWebUI to use the new Pasteguard proxy.
Log into our OpenWebUI website
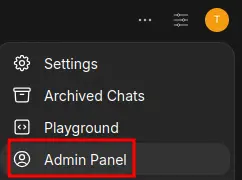
Open the Admin Panel:
Switch to settings:
And open the Connections from the menu.
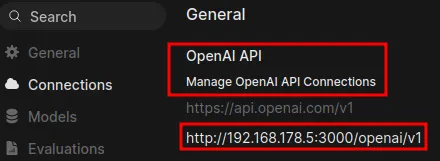
In the Connections menu, you can now paste your Pasteguard-URL as an OpenAI API connection. The URL Syntax is http://localhost:3000/openai/v1 or if you are running Pasteguard on a different server with (for example) the IP 192.168.178.5: http://192.168.178.5:3000/openai/v1:
Dont forget to enter your API-key for OpenAI in the connection.
And thats it - your chats are now send to Pasteguard, which protects them before forwarding it to OpenAI.
Test it in OpenWebUI with some example chat like “My e-mail address is info@xyz.com and my telephone number is +40 111 123456”, and you should see this request in the Pasteguard Dashboard as “masked data..”.
In that guide the integration of Openrouter is explained, basically you just need to add a function for Openrouter in OpenWebUI.
The used function from this guide needs a small adjustment to use Pasteguard instead of the Openrouter API.
Open the added function (https://openwebui.com/f/preswest/openrouter_integration_for_openwebui) in OpenWebUI and edit row 307 in the code of the function from:
url = "https://openrouter.ai/api/v1/chat/completions""
to:
url = "http://localhost:3000/openai/v1"
or, if running Pasteguard on a different server (use the correct IP):
url = "http://192.168.178.5:3000/openai/v1".
Now, edit the config.yaml of your Pasteguard container (shown earlier). In the configuration, you need to adjust the base_url of OpenAI from:
openai:base_url:https://api.openai.com/v1
to:
openai:base_url:https://openrouter.ai/api/v1`
After editing the config.yaml, restart the container, OpenWebUI should now route the chats correctly. Test it in OpenWebUI with some example chat like “My e-mail address is info@xyz.com and my telephone number is +40 111 123456”, and you should see this request in the Pasteguard Dashboard as “masked data..”.
If you run into any problems, got questions or requests for additional informations, feel free to leave a comment below (no sign-in required).